Beginning Tutorial - Create New Form
First, open the EZSurvey program. Do this by selecting EZSurvey from the Start menu (it will be in the Start  Programs Raosoft folder). When EZSurvey opens, the Edit Form window opens by default on top of the main EZSurvey window. Unless specified differently, EZSurvey will automatically load the last project was open when it is launched. To review an existing form, open Demoform.ezf by selecting File Open EZSurvey Project from the main EZSurvey menu.
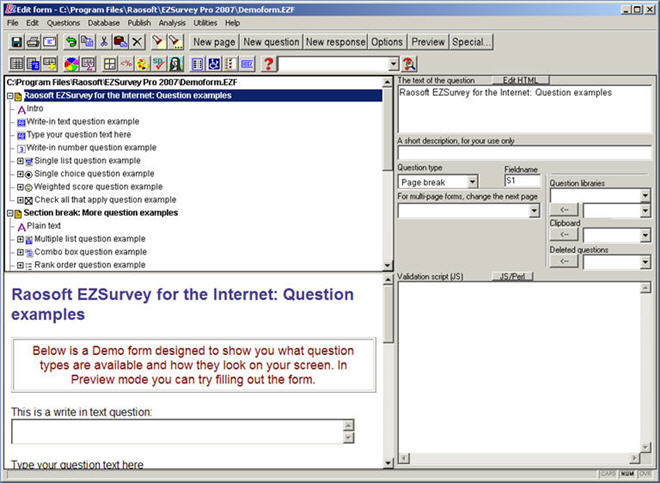
The left side of the screen displays the contents of the Demo project. As you select on a question, its properties will appear on the right. Note that a question can have two titles: the question text, and a shorter, descriptive name for your use only. This shorter title will be used in lists of questions throughout the program window. Close the Demoform.ezf file when you are ready to write your own form.
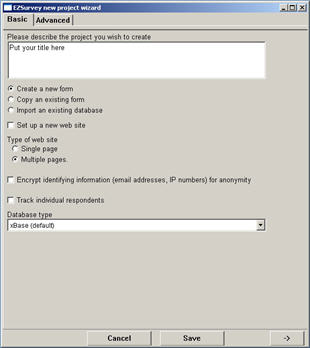
- Select File New EZSurvey project from the main EZSurvey menu. The New project wizard opens to guide you in creating the structure of your form. Type in a title for the form, such as "My First EZSurvey Form". Leave the other options on their default settings for now, and select on SAVE to continue.
- After the New project wizard window is closed, the Edit Form Window will open. In the list on the left, you will see the structure of your form and the project properties. Select the New Question button. The text "Type your question text here" is displayed in "the text of the question" box on the right side of the window. Replace the words "type your question text here" with "What is your favorite color?".
- In the Question type list, set the question type to Single choice. This identifies the type of question that you are creating. Other question types include: write-in questions, multiple choice, single and multiple lists, check all that apply, hidden, and date/time questions. For descriptions of all the question types, see the Edit Form Window link at the bottom of this page.
- In the question description box, type in a short description of the question, such as "Favorite Color". Using a short description of the question allows you to identify the question later by the short description rather than the complete question text. The short description will show up in the question list.
- Select the fieldname box, and type in "FavColor". The fieldname links the answers to the question that corresponds to the fieldname inside the database.
Note: Don't change a fieldname if you already have data! This will remove the old fieldname from the database, along with the data stored in that field.
- Click the New response button on the menu bar. This will create a default first response with the text "Type your response text here", with the code "1". The code represents how EZSurvey stores it in a database. Respondents will only be able to see the response text.
- Change the response by selecting the response text in the response text box and replacing it with Red. You can also change the response code. You may want to change the code when you anticipate using your survey data as part of a bigger database. For example, use the code "NY" to represent the response of "New York". If you change the response codes after data has been collected, the old response codes will not have a response text associated with them.
- Your response has now been added and you are ready to continue. Note: The changes will appear in the left side when you select on another command or select anywhere in the left hand pane.
- Repeat steps 6 - 7, and add the responses Blue, Green, and Black. When you have added the last response, click on "FavColor" in the list on the left side of the window. By clicking on the question after typing in the last response, all responses are displayed in the left window.
- To add a new question, click on New question and repeat as above. The default question type will be single choice. You may change the question type by simply selecting a different type in the Question type box.
- Continue to add additional questions by repeating steps 2 - 10.
- Save the survey by selecting File Save or File Save as from the menu and typing in a filename, tutorial.ezf. Note: The file name and path appear in the first line in the left hand pane (above the questions), replacing "Untitled".
- To see your survey as a web page, click on the Preview button, or select Publish Preview web form from the Edit form menu. Preview mode shows the appearance of the web page, but some features that require a web server are not available. To create a web form, see the Publish a web form link at the bottom of this page.
- To preview your survey as an email text, select File Export Text (email) from the Edit form menu. Type in a filename, such as Myform.txt. A window will appear with the results. Note how the questions appear. You can also practice filling out a send-out text form. Answer multiple choice and list questions by placing an 'X' between the brackets. Answer write-in questions by placing the text between the brackets or free-form. Close the window when you are done. You do not need to save this text file.
- See how EZSurvey's analysis works. Open the project Demoform.ezf and select the menu item, Analysis Summary from the Edit form window. Click OK. A window will appear displaying graphs of each choice, and options from which you can select.
- Zoom in and out using the toolbar. Select Analysis Summary again, and try different graph types and options.
- Try other features of EZSurvey. Try all the buttons on the toolbar to see what they do. Try creating data. For more detailed descriptions, select Help from the menu.
- After generating a graph, you may want to save it as an Adobe Acrobat PDF file. To save, the graphs, select File Export PDF(Acrobat) from the Drawing-Summary screen's menu. You may now view the graph in an Acrobat reader. This will save all the graphs for this EZSurvey project.
See also...