This is a step-by-step guide to installing EZSurvey web forms on a
1. Open your form. On the Edit form window, select ![]() Create a web form. The Web site configuration window will appear. If no web sites have been set up, you will first see the New site setup window, as described in the second step below. If there is no response from clicking on Create a web form, make sure your form has a valid database associated with it.
Create a web form. The Web site configuration window will appear. If no web sites have been set up, you will first see the New site setup window, as described in the second step below. If there is no response from clicking on Create a web form, make sure your form has a valid database associated with it.
2. Click on the Add button next to the Site Address text box. The New site setup window will appear. The intention of this window is to provide EZSurvey with detailed specifications for a particular web server. You can have more than one web server, or more than one folder to place files on a particular web server. Each server or server location should have its own entry in the Site address list. Most EZSurvey users will have only one web site address to use.
3. Within the New site setup window, first select the appropriate server program from the Quick Setup listbox. In this case, select "Microsoft Internet Information Server". Choosing Quick Setup enters values in the Scripts directory field, and the Directory in which to place uploads. The Quick Setup folder names are the default names for the particular server type. Your web server administrator may have chosen names for these folders that are different from the names given using Quick Setup. Next, enter the appropriate web Server address. You can enter it as an IP address, like the default one shown, or you can enter the domain name, for example: "www.ots.gov". The address "127.0.0.1" refers to the computer you are currently working on. This address can only be used for testing on your machine. In the Script directory text box enter the scripts directory for your web server, if it is different from the default provided.
You may have noticed by now that while you make changes in the "Server address" and "Scripts directory" text boxes, the entry in the "Directory in which to place uploads" path changes. This change may or may not be desirable, depending on where your web server is located.
When you initially choose the Quick setup option for Windows servers, the Directory in which to place uploads is given as "C:\Inetpub\Scripts". This assumes that the web server is on the same computer you are working on. In actuality, the web server may be elsewhere on the network, or out on the internet.
When the web server is on the local network (or your computer), the Directory in which to place uploads should be the full path to the Scripts directory, starting with the appropriate network drive letter.
When the web server is on the internet (or not directly accessible on the network) the Directory in which to place uploads should be set to the default, or to another easily accessible folder on your computer. These files will then be transferred via FTP to the web server. It is this folder that will open up in Windows Explorer showing all of the web server files.
Finally, on this New site setup window, you need to give your web site configuration a meaningful name, such as "mysurvey-IIS".
4. Once you click on the OK button, you will be returned to the Web site configuration window. The name of your new web site will appear in the Site address text box. Next, click on the radio button for the appropriate type of web server. In this case, Windows servers using CGI is the preferred choice. The two other Windows server options are offered for instances where first choice is not feasible on your web server.
You will also notice a default "password" in the Password text box. This is the password that allows you to access your web form's data files remotely through the Administer web site function accessed using the button at the bottom of the window. You may change this password if you wish. This password is only for remote data retrieval via your web browser. It does not affect your FTP access to your web server in any way. The remote administration feature is disabled by some firewalls and by some internet service providers security settings. In these cases, retrieve data files from the web server via FTP.
5. Click on the Close button to move to the Web form setup window.
6. Make sure the correct web site name appears in the Web site text box. Next, select the radio button for creating single page or multiple-page forms. If you select multiple page forms, your EZSurvey form must have Section Title entries to serve as headings for the page breaks. Select the radio button for Save responses on the server(recommended) This option must be selected to generate a web form. (Please note that the "Through e-mail" option will not work with web browsers that use independent e-mail programs for sending web form e-mail messages. This includes Internet Explorer and some versions of Netscape's browsers. Use this option only when you are sure that it is compatible with your participants computer system)
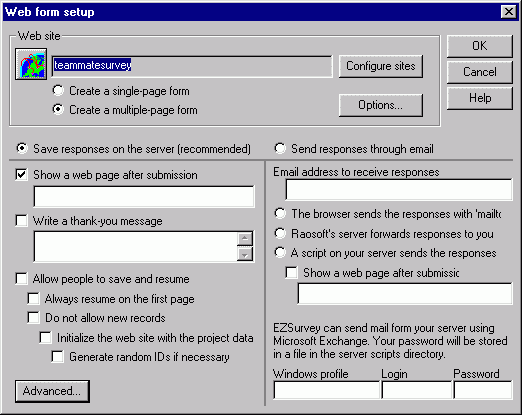
Additional functions are available in the lower left portion of the Web form setup window. For information on choosing between these options, follow the link to Web form setup below. For all surveys it is recommended that you add either a thank-you message or show a web page after submission. These two functions provide you an opportunity to let the participants know that their responses have been saved and a are means for continuing their path to a new web page of your choice. Without using the follow-up URL and thank-you message functions, the web browser ends up displaying a blank page without any links to other pages.
7. Click the OK button to create the files needed for the web server. Two new windows will appear. The first window is a text document which contains further instructions for setting up your survey, and provides a link used to access the survey. Second, Windows Explorer opens with a view of the web server files. If you have already set your "Directory in which to place uploads" to be on the web server, you can close the Explorer window. If your web server is not accessible via the network, you need to move these files to the web server, usually using an FTP program.
The following text document appears with instructions on how to complete the web survey setup process. Selecting certain options will change the instructions you are given.
EZSurvey is creating several files for your web server, which you will
see in an Explorer window. If your web server is on a remote computer, you
should copy all of these files to your server's CGI script directory.

You should configure your web server so that it only allows execution of
programs in the CGI script directory, and does not allow visitors to
read files or browse the directory's contents.

You may direct your respondents to the URL

     http://127.0.0.1/scripts/ezs.exe?DATABASE=questiontypes

to start the form.

A starter page will also be created. If you want to override the default
answers for the questions in this form, you can modify the file
questiontypes.html and instead direct your respondents to the URL

     http://127.0.0.1/scripts/questiontypes.html

to start the form.
Executable permission allows you to run the ezs.exe program which is an integral part of your web survey. If you are using the ISAPI or PERL option, ezs.exe will be replaced with ezs.dll or yoursurvey.pl, respectively.
Read access should be disabled as well to keep others from viewing critical files, such as the data file. If required, you can individually allow read access to the .html file, which is usually necessary for single page surveys.
At this point, you can access the survey by copying and pasting the URL listed in the text file into the address bar on your web browser.